
How to Enable the Fingerprint Reader in Linux on the Framework Laptop
This article describes the process for enabling the fingerprint reader on Linux using the fprintd service. Linux Mint and a Framework laptop based on the AMD Ryzen platform is used as an example for this guide.
Microsoft Windows has evolved over the years to support a diverse range of hardware out of the box. This is includes the recently introduced range of Framework laptops, particularly the AMD Ryzen variants.
Although these devices have fully support for Linux, this support is primarily focussed to achieve maximum compatibility with Ubuntu... so far.
I have been using Linux Mint, as my primary operating system, for almost two years. So I installed Mint on the Framework laptop. The device I used had the Ryzen 7, and the standard Goodix fingerprint reader, which is built into the power button on all Framework laptops.
The default installation of Mint does not make it very obvious that there is support for the fingerprint reader.
Upon searching the internet for solution, the answer was found in none other than the Linux Mint forums.
User jodarove has provided a step-by-step guide in a post on the Mint forums.[1]
This post summarizes the steps required to enable the fingerprint reader and start using it.
Hardware Identification
Before proceeding, it is important to ensure that the hardware is supported.
Identify the exact hardware by checking its USB ID.
lsusb
This should list all the USB devices, including the fingerprint reader (which is internally connected via USB).
Here's an excerpt from an example output.
Bus 001 Device 001: ID 1d6b:0002 Linux Foundation 2.0 root hub
Bus 001 Device 002: ID 32ac:0003 Framework DisplayPort Expansion Card
Bus 001 Device 003: ID 27c6:609c Shenzhen Goodix Technology Co.,Ltd. Goodix Fingerprint USB Device
Bus 001 Device 004: ID 0e8d:e616 MediaTek Inc. Wireless_Device
Bus 002 Device 001: ID 1d6b:0003 Linux Foundation 3.0 root hub
Bus 003 Device 001: ID 1d6b:0002 Linux Foundation 2.0 root hub
Bus 004 Device 001: ID 1d6b:0003 Linux Foundation 3.0 root hub
In this example, the fingerprint reader is found on Bus 001 Device 003
Bus 001 Device 003: ID 27c6:609c Shenzhen Goodix Technology Co.,Ltd. Goodix Fingerprint USB Device
The USB ID in this example is 27c6:609c.
Check if the USB ID of your device's fingerprint reader can be found on libfprint's supported devices list here.
Setup
Install fprintd
fprintd is a software service that facilitates fingerprint scanning functionality.[2]
sudo apt install fprintd
Install the Associated PAM Module
The fprintd suite also includes a PAM module to implement user login. Install the library/module PAM module.
sudo apt install libpam-fprintd
Add Fingerprint as a Recognized Authentication Method
The fprintd PAM module integrates into the system's authentication mechanism.
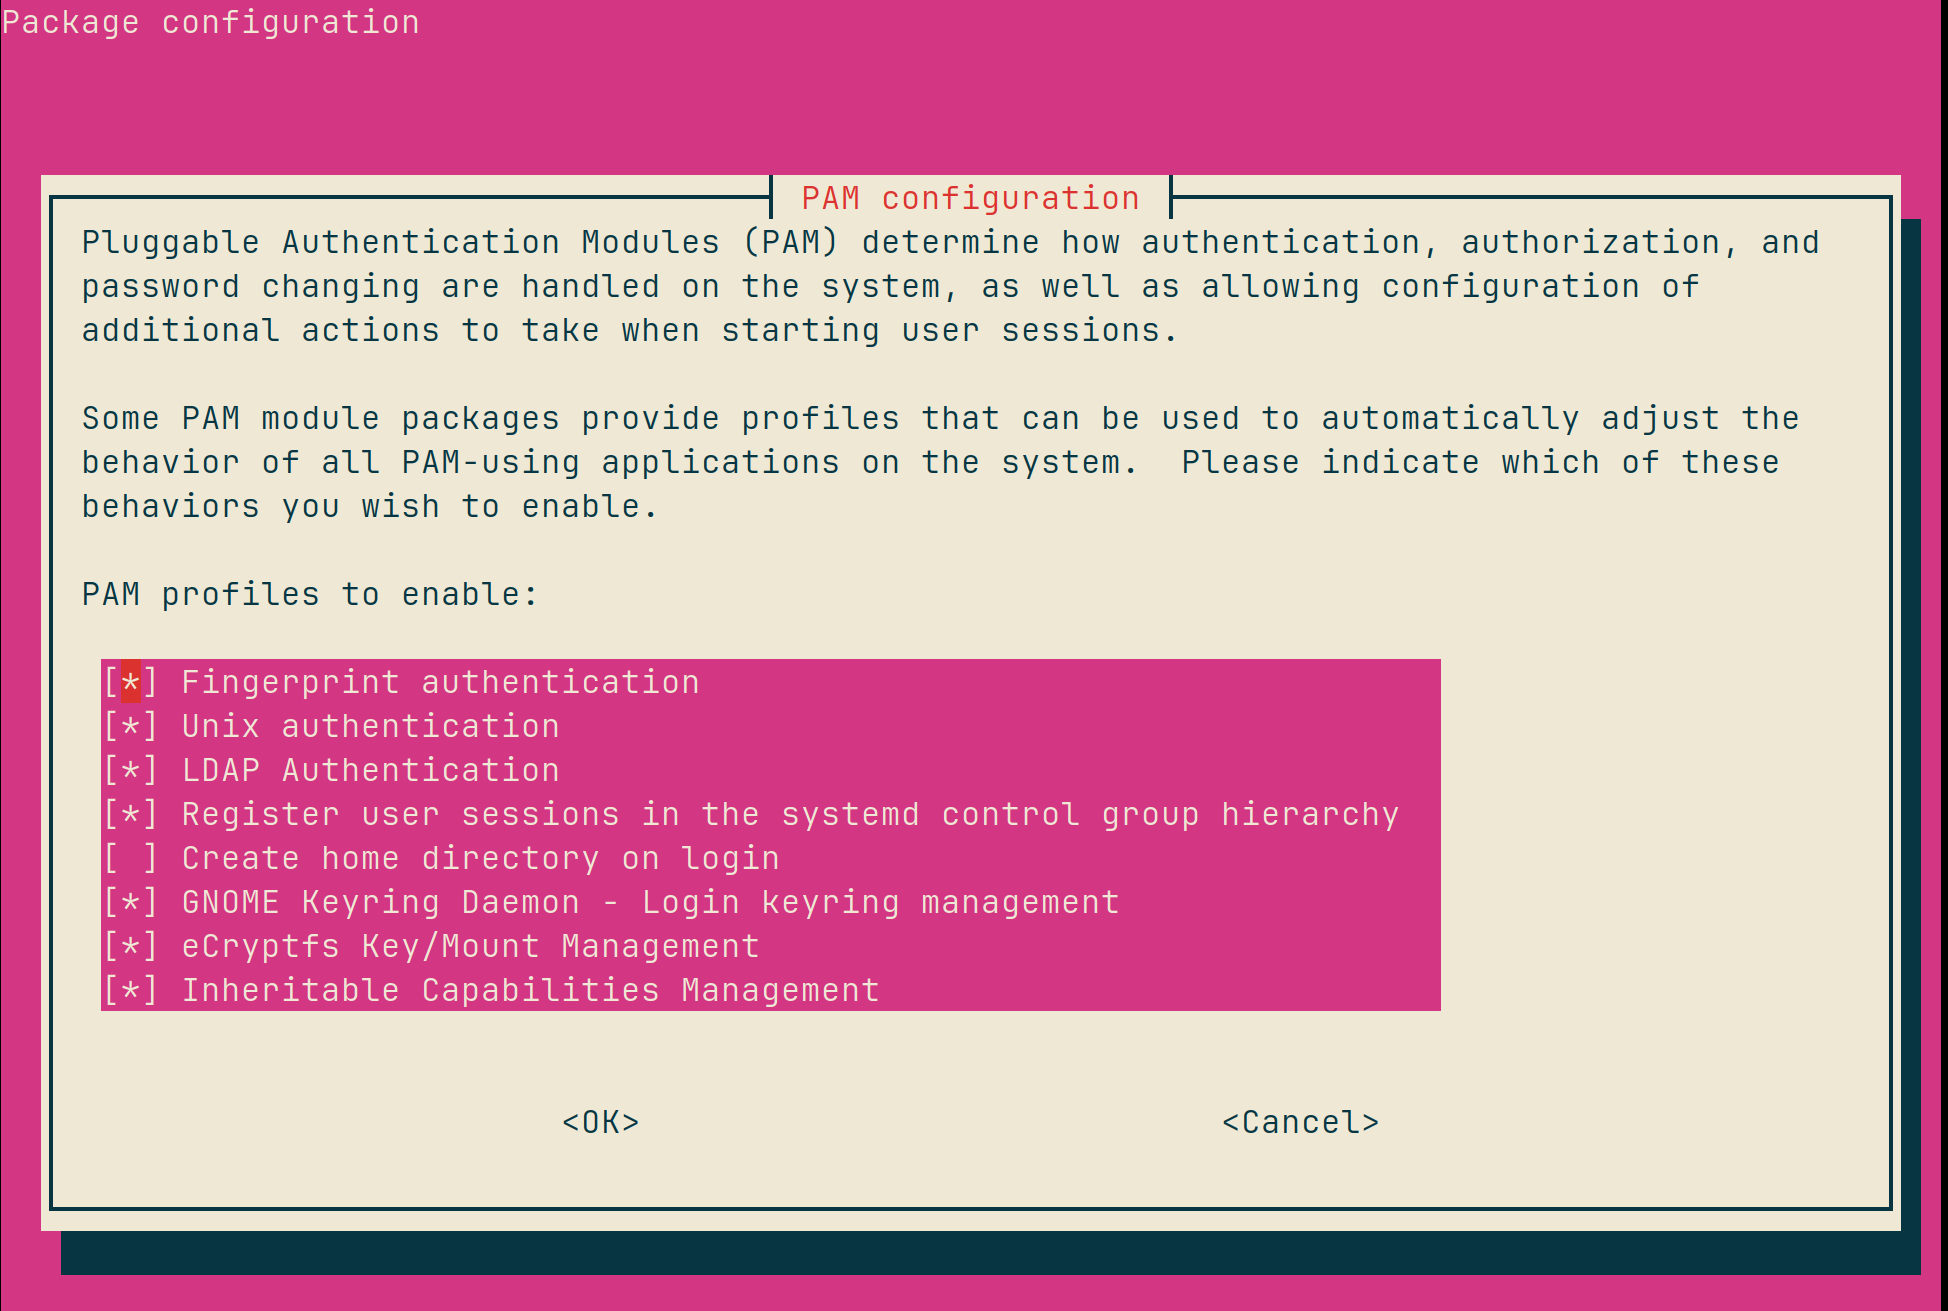
Run the following command to invoke the selection screen.
sudo pam-auth-update
This command will allow the management of available PAM profiles. Select & enable Fingerprint authentication. Leave other profiles unchanged.
Fingerprint Management
Unfortunately this process does not provide any GUI to enroll fingerprints. However the fprintd suite also provides CLI tools to manage fingerprints. These can be used by all users, without escalated privileges.
- fprintd-enroll
- fprintd-verify
- fprintd-list
- fprintd-delete
All of the above commands require, at least, the authentication for the user being queried.
Enroll Fingerprints
Use the fprintd-enroll command to register a fingerprint. Although parameters are optional for this command, the finger being enrolled can be specified with --finger or -f.
The following arguments are acceptable values for this parameter.
left-thumbleft-index-fingerleft-middle-fingerleft-ring-fingerleft-little-fingerright-thumbright-index-fingerright-middle-fingerright-ring-fingerright-little-finger
So the full command for enrolling the index finger on the right hand would be as follows:
fprintd-enroll -f right-little-finger
If you are familiar with enrolling fingerprints on other platforms like Windows, iOS or Android, the process is very similar. The command repeatedly prompts to scan various regions of the finger, in stages, until it gets a complete scan.
Using device /net/reactivated/Fprint/Device/0
Enrolling right-little-finger finger.
Enroll result: enroll-stage-passed
Enroll result: enroll-stage-passed
Enroll result: enroll-stage-passed
Enroll result: enroll-stage-passed
Enroll result: enroll-retry-scan
Enroll result: enroll-stage-passed
Enroll result: enroll-stage-passed
Enroll result: enroll-stage-passed
Enroll result: enroll-stage-passed
Enroll result: enroll-stage-passed
Enroll result: enroll-stage-passed
Enroll result: enroll-stage-passed
Enroll result: enroll-stage-passed
Enroll result: enroll-completed
List Enrolled Fingers
A list of enrolled fingers can be obtained by running the fprintd-list command. It requires the username as a positional parameter.
So, to list the enrolled fingers for the user peter, the following command can be run.
fprintd-list peter
This command will prompt for peter's password. If this command is being run by a user from the sudo group, they may be able to authenticate.
found 1 devices
Device at /net/reactivated/Fprint/Device/0
Using device /net/reactivated/Fprint/Device/0
Fingerprints for user peter on Goodix MOC Fingerprint Sensor (press):
 - #0: right-thumb
 - #1: left-index-finger
 - #2: right-index-finger
Verify Enrolled Finger
fprintd also provides a utility to verify a previous enrolled fingerprint. It accepts the specific finger to verify through the parameter -f.
For example, to verify if the right-index-finger is enrolled correctly, the following command may be run.
fprintd-verify -f right-index-finger
It will wait until any finger is scanned; and will then output the result.
Here's an example result of a successful match.
Using device /net/reactivated/Fprint/Device/0
Listing enrolled fingers:
 - #0: right-thumb
 - #1: left-index-finger
 - #2: right-index-finger
Verify started!
Verifying: right-index-finger
Verify result: verify-match (done)
Here's an example result of a failed match.
Using device /net/reactivated/Fprint/Device/0
Listing enrolled fingers:
 - #0: right-thumb
 - #1: left-index-finger
 - #2: right-index-finger
Verify started!
Verifying: right-index-finger
Verify result: verify-no-match (done)
Delete Fingerprint
fprintd's fprintd-delete utility deletes a previous enrolled fingerprint. It requires the specific finger (to be deleted) through the -f parameter.
Here's the command to delete the fingerprint enrolled as left-little-finger
fprintd-delete -f left-little-finger
Usage
First Login
The default login manager for Linux Mint Cinnamon identifies which user has registered fingerprint(s), so when that user is selected from the list of users during first login.
However it recognizes that the user may accidentally touch the fingerprint sensor, so it requires the user to press enter or click login once the fingerprint authentication is successful.
It times out after a some time and then requires the user to enter their password. This can be reset be select another user from the list and then returning to the user, which prompts for the fingerprint again.
Screen Unlocking
When unlocking the screen, the process is very straightforward. The GUI presents the standard password login prompt with a small message below the password field, prompting the user to place their finger on the fingerprint sensor.
Command Line Interface (CLI)
su
Use of su to login as another user in the terminal automatically identifies if the second user has any fingers registered. An attempt to login as another user prompts for the registered finger(s).
In the example below the user localadmin has the right little finger registered.
localuser@localmachine:~$ su - localadmin
Place your right little finger on the fingerprint reader
localadmin@localmachine:~$
sudo
Use of sudo to run administrative commands in the terminal automatically identifies if the sudo user has any fingers registered. An attempt to run such commands prompts for the user's finger(s).
In the example below the user localadmin has the right little finger registered.
localadmin@localmachine:~$ sudo cat /etc/os-release
Place your right little finger on the fingerprint reader
NAME="Linux Mint"
VERSION="22.1 (Xia)"
ID=linuxmint
ID_LIKE="ubuntu debian"
PRETTY_NAME="Linux Mint 22.1"
VERSION_ID="22.1"
HOME_URL="https://www.linuxmint.com/"
SUPPORT_URL="https://forums.linuxmint.com/"
BUG_REPORT_URL="http://linuxmint-troubleshooting-guide.readthedocs.io/en/latest/"
PRIVACY_POLICY_URL="https://www.linuxmint.com/"
VERSION_CODENAME=xia
UBUNTU_CODENAME=noble
An unsuccessful attempt to run the command using the the fingerprint falls back to the typical password authentication
localadmin@localmachine:~$ sudo cat /etc/os-release
Place your right little finger on the fingerprint reader
Failed to match fingerprint
[sudo] password for localadmin:
NAME="Linux Mint"
VERSION="22.1 (Xia)"
ID=linuxmint
ID_LIKE="ubuntu debian"
PRETTY_NAME="Linux Mint 22.1"
VERSION_ID="22.1"
HOME_URL="https://www.linuxmint.com/"
SUPPORT_URL="https://forums.linuxmint.com/"
BUG_REPORT_URL="http://linuxmint-troubleshooting-guide.readthedocs.io/en/latest/"
PRIVACY_POLICY_URL="https://www.linuxmint.com/"
VERSION_CODENAME=xia
UBUNTU_CODENAME=noble
The above command does not require sudo to run, but is shown for illustrative purpose only.
Known Limitations
Keyring
Most Linux distributions have a built-in keyring service which protects secrets for each user. Usually, this keyring is locked with the user's account password.
When a user logs in with their enrolled fingerprint, the fprintd PAM module authenticates the user, but this does not unlock the keyring.
Typically, when this happens, the desktop environment will prompt the user for a password to unlock the keyring. The user will have to enter their password at this prompt to take advantage of the keyring functionality.
References
Image by Pete Linforth from Pixabay
Update 1 • 5-Apr-2025
- Clarified some statements to properly differentiate between "argument" & "parameter" for commands. [ref]
- Minor typographical corrections.
- Changed feature image in the article banner to allow the article title to be readable.
Update 2 • 20-Apr-2025
- Added demonstration of use during login and unlocking.
- Added demonstration of use in command line interface - su & sudo.
- Added demonstration of fallback to password authentication in case of failure to authenticate with fingerprint to run an administrative command using sudo.
Update 3 • 20-Aug-2025
- Added note about inclusion of fingerprint management functionality in Linux Mint 22.2 “Zara”.
Update 4 • 21-Jun-2026
- Clarified the management of PAM profile in PAM authentication.