
Changing DNS Provider for Lets Encrypt in NGINX Proxy Manager
This article shows how to change the DNS provider in NGINX Proxy Manager for SSL certificates configured for Let's Encrypt. It uses an example change from either Namecheap or Cloudflare to Porkbun.


This article describes the process of changing the DNS provider or its API credentials in NGINX Proxy Manager for a SSL certificate configured for auto-renewal from Let's Encrypt. It identifies the steps involved, provides the rationale behind the approach and demonstrates an example where the DNS configuration is changed from either _Namecheap_or Cloudflare to Porkbun.
NGINX Proxy Manager (NPM) has brought incredible convenience to self-hosters, especially in the application virtualization space, since it provides an intuitive way to generate reverse proxy routes for containerized applications.
Although NGINX, itself, makes this very easy, it can get very cumbersome to manage a large number of services through a bunch of configuration files, especially when ongoing maintenance and technical debt can turn into security nightmares very quickly. NPM takes this convenience to the next level by abstracting away the many parallel configurations and providing a slick & intuitive web interface for managing the NGINX reverse proxy. Moreover it provides additional functionality like managing SSL certificates. This includes coordinating with the Let's Encrypt certificate authority (CA) to request, authenticate, validate and install these certificates to the relevant virtual hosts (services), and then renewing these certificates periodically by utilizing Let's Encrypt's ground-breaking ACME protocol.
For the SSL certificate management functionality NPM uses Certbot, which is packaged with the application, along with a host of wrappers and scripts which coordinate with Certbot. A salient feature of NPM is that it provides a single interface for working with a variety of DNS providers for the DNS-01 ACME challenge. Depending on the DNS provider selected for the certificate, NPM selects & installs the relevant Certbot plugin for a seamless experience.
This article attempts to identify a situation where a DNS provider may need to change, evaluates the limitations in NPM's inability to make certain changes. It then establishes an approach to fill this gap in NPM's capability, and describes the step-by-step process to make the required changes. It includes an example to clarify the explanation used in this article.
The Challenge
Recently I moved my DNS provider from Namecheap to Porkbun as I have realised that the former's actions seem to be deviating away from their name (not very cheap any longer!). I have recently discovered Porkbun as a simple, feature-rich DNS registrar providing good value.
However, I completely forgot that NPM was happily trying to respond to Let's Encrypt's DNS-01 challenges by updating the DNS records at Namecheap, which was no longer the DNS provider for the domain in question.
As awesome as NPM is, it does not provide a way to change the DNS provider or any other settings, once a SSL certificate has been setup for a particular DNS provider. So I was left with the following three options:
- Remove the certificate & the DNS provider in NPM & setup a new DNS provider for a new SSL certificate.
- Even with Porkbun as my new registrar, retain DNS management at Namecheap by using Namecheap's FreeDNS service.
- Get under the hood of NPM and change the relevant configuration manually.
The problem with the first approach is that everytime you setup a new DNS provider in NPM, it creates a new pseudo-account with Let's Encrypt. Although the latter doesn't seem to mind, I have a reservation against creating a multitude of accounts and not having a track of them.
The second option is extremely easy, as it only involves specifying Namecheap's DNS name servers in the Porkbun control panel, and then managing the DNS zone in Namecheap. However the issue with this second option is that I believe that no DNS provider would treat it's free-tier customers as first class citizens. Moreover, Namecheap was quite late to the party with supporting TXT records of more than 255 characters (very useful for 2048-bit DKIM keys), so I am not motivated to pay them separately purely for DNS management. Due to this I have already been looking for alternatives for some time, but Namecheap has been the cheapest for almost 20 years.
This leaves the third option, which we has been covered in this article.
Assumptions
To clarify the scope of this article the following assumptions have been made.
- NPM has been installed as an application container (Docker, Podman, etc.).
- The desire is to move the DNS provider configuration of a SSL certificate from an existing DNS provider to Porkbun.
- The specific certificate in NPM has an index of
43(details below). - File & directory paths used are internal to the NPM container.
- All emails, usernames, passwords, keys & tokens used in this article are examples.
Approach
Understanding NPM's workflow
Without going into the gory technical details of how NPM technically integrates Certbot and it's plugins, the key areas where NPM stores plugin definitions, configuration and credentials for the DNS providers are as follows.
- Certificate renewal configuration.
- DNS provider credentials.
- NPM database.
Identifying Key Pieces
Since NPM uses Certbot as its upstream client to coordinate SSL certificate provisioning from Let's Encrypt, the first port of call is to review the available plugins in the Certbot docs. These are broadly split into two categories...
- A core set of first party DNS plugins - https://eff-certbot.readthedocs.io/en/stable/using.html#dns-plugins
- An additional suite of third party plugins maintained by the community - https://eff-certbot.readthedocs.io/en/stable/using.html#third-party-plugins
Case Study - Change to Porkbun
As per the scope of this article, let's assume that the DNS provider for one of the certificates needs to be changed to Porkbun. Certbot has a third party plugin for Porkbun - https://github.com/infinityofspace/certbot_dns_porkbun.
Renewal Configuration
NPM stores configuration for certificates and associated settings (like the DNS provider information for DNS-01 ACME challenges) in its Let's Encrypt settings area. This is especially useful during the regular renewal process as part of NPM's routine. File names for each certificate configuration include NPM's internal certificate index. Based on the assumptions, this file would be /etc/letsencrypt/renewal/npm-43.conf.
Firstly backup this file.
sudo cp /etc/letsencrypt/renewal/npm-43.conf /etc/letsencrypt/renewal/npm-43.conf.bak
This file specifies the Let's Encrypt account & credentials to use, as well as references to DNS provider being used and the location of the credentials file.
Edit the [renewalparams] section and change the authenticator definition and the dns...credentials, as follows.
For certificates previously configured with Cloudflare as the old DNS provider, configuration would look like this.
| Old Parameter | Old Value |
|---|---|
authenticator |
dns-cloudflare |
dns_cloudflare_credentials |
/etc/letsencrypt/credentials/credentials-43 |
For certificates previously configured with Namecheap as the old DNS provider, configuration would look like this.
| Old Parameter | Old Value |
|---|---|
authenticator |
dns-namecheap |
dns_namecheap_credentials |
/etc/letsencrypt/credentials/credentials-43 |
To migrate to Porkbun, change to the following configuration.
| Old Parameter | Old Value |
|---|---|
authenticator |
dns-porkbun |
dns_porkbun_credentials |
/etc/letsencrypt/credentials/credentials-43 |
Certbot Credentials Storage
Plugin Requirement
Although there is no need to interact directly with Certbot, this section describes the key behaviour of the specific plugin needed for the new DNS provider. The purpose of discussing this is to show how to ascertain what the plugin expects and how NPM provides compatibility.
The relevant Certbot for Porkbun DNS accepts credentials through two alternative routes.
1. CLI Parameter
One option is to use CLI parameters to pass authentication information to Certbot.
...
--dns-porkbun-key <your-porkbun-api-key> \
--dns-porkbun-secret <your-porkbun-api-secret>
2. Configuration File
To prevent credentials from showing up in terminal history or logs, a credentials-file porkbun.ini (the name does not matter) can be created with the following content and passed to the command.
dns_porkbun_key=<your-porkbun-api-key>
dns_porkbun_secret=<your-porkbun-api-secret>
NPM's Approach
For each SSL certificate configured in NPM, there is a credentials file for the relevant DNS provider access, as per the renewal configuration.
NPM tries to ensure that, before any attempt to request or renew a certificate takes place, Certbot should have access to a credentials file to use with the DNS provider so it can respond to the ACME DNS-01 challenges by updating the relevant _acme-challenge TXT record for the associated domain.
NPM saves the credentials for the DNS providers in the database in the certificate table. The contents of the associated database record depends on the configuration format expected by the relevant plugin. In the Porkbun example above, NPM uses the configuration file approach and saves the contents of such a configuration file, complete with the actual credentials, in a text field in the database. For new configurations, since the credentials files don't exist, NPM transfers the credentials from the database to the file at startup, creating it if it doesn't exist.
Based on the assumptions, this file would be /etc/letsencrypt/credentials/credentials-43.
For certificates configured with Cloudflare as the DNS provider the file contents would look like the following.
# Cloudflare API token
dns_cloudflare_api_token = L5n9n5WkkPo4HgKWaB0nsodCtQuiUEyESZ-lJy3Z
For certificates configured with Namecheap as the DNS provider the file contents would look like the following.
dns_namecheap_username = certmaster
dns_namecheap_api_key  = whhaqwnkf4sts5iec3oyro0oid60ogjc
For migrating to Porkbun, simply specify Porkbun's API key and API secret, as per the requirement of the Porkbun Certbot plugin.
dns_porkbun_key=pk1_bt7twcek5twatka1u2emcllru1jwfwz7wn8jtyo3xncib6iqv6jscwoy6k9itm49
dns_porkbun_secret=4t87h03ffl7732a69j59myaaibyc06q9hy94cnv9lrpizqt6en7o7ldpkikjrs9x
Database record
When a new DNS provider profile is created, NPM saves this configuration in the database. It is used to create & populate the credentials file when NPM starts, if the file doesn't exist. Since the scope of this article is to edit the settings of an existing SSL certificate configuration, the relevant database record should be edited manually to replace the old settings with the new.
Access the NPM database as per your environment and find the table named certificate. This table contains the configuration for each certificate managed by NPM, whether it is through its built-in Let's Encrypt management functionality or custom imported certificates & keys.
Each certification configuration record is identified by NPM's internal certificate index in the id field of this table. This index can be checked through NPM's web UI as shown in the screenshot in Fig. 1.
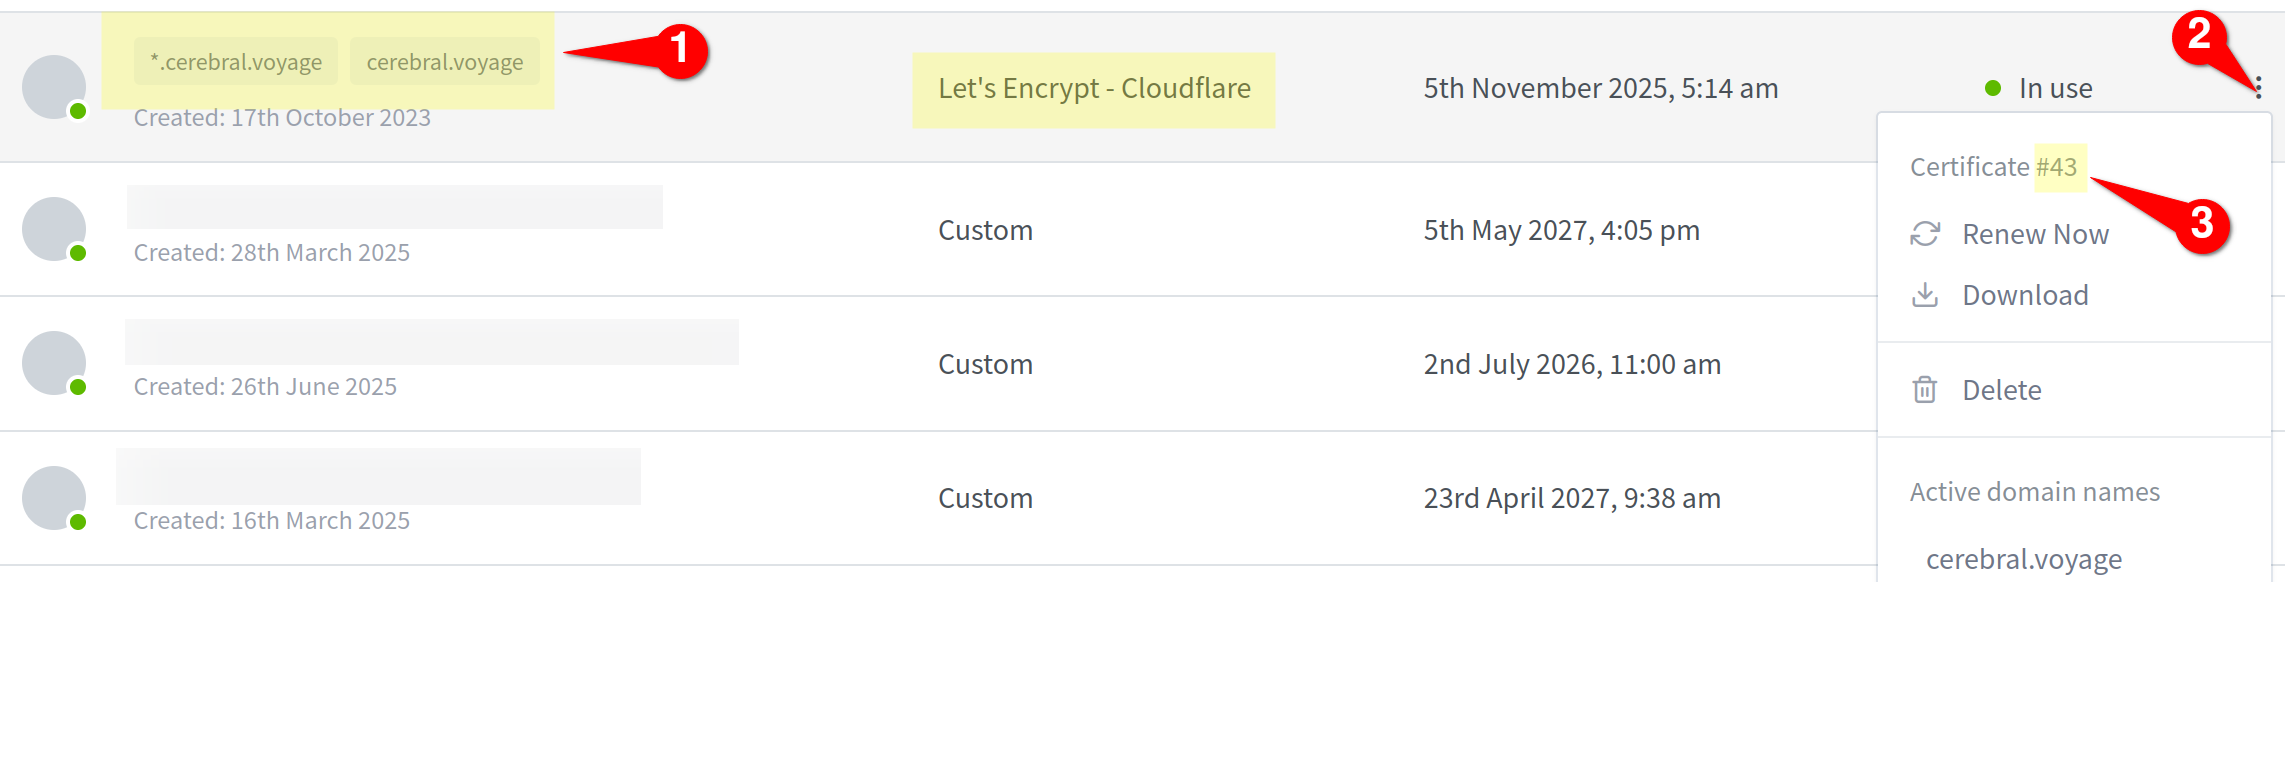
Once the index is found, find & edit this record in the certificate table with the same id. This has been illustrated in Fig. 2.
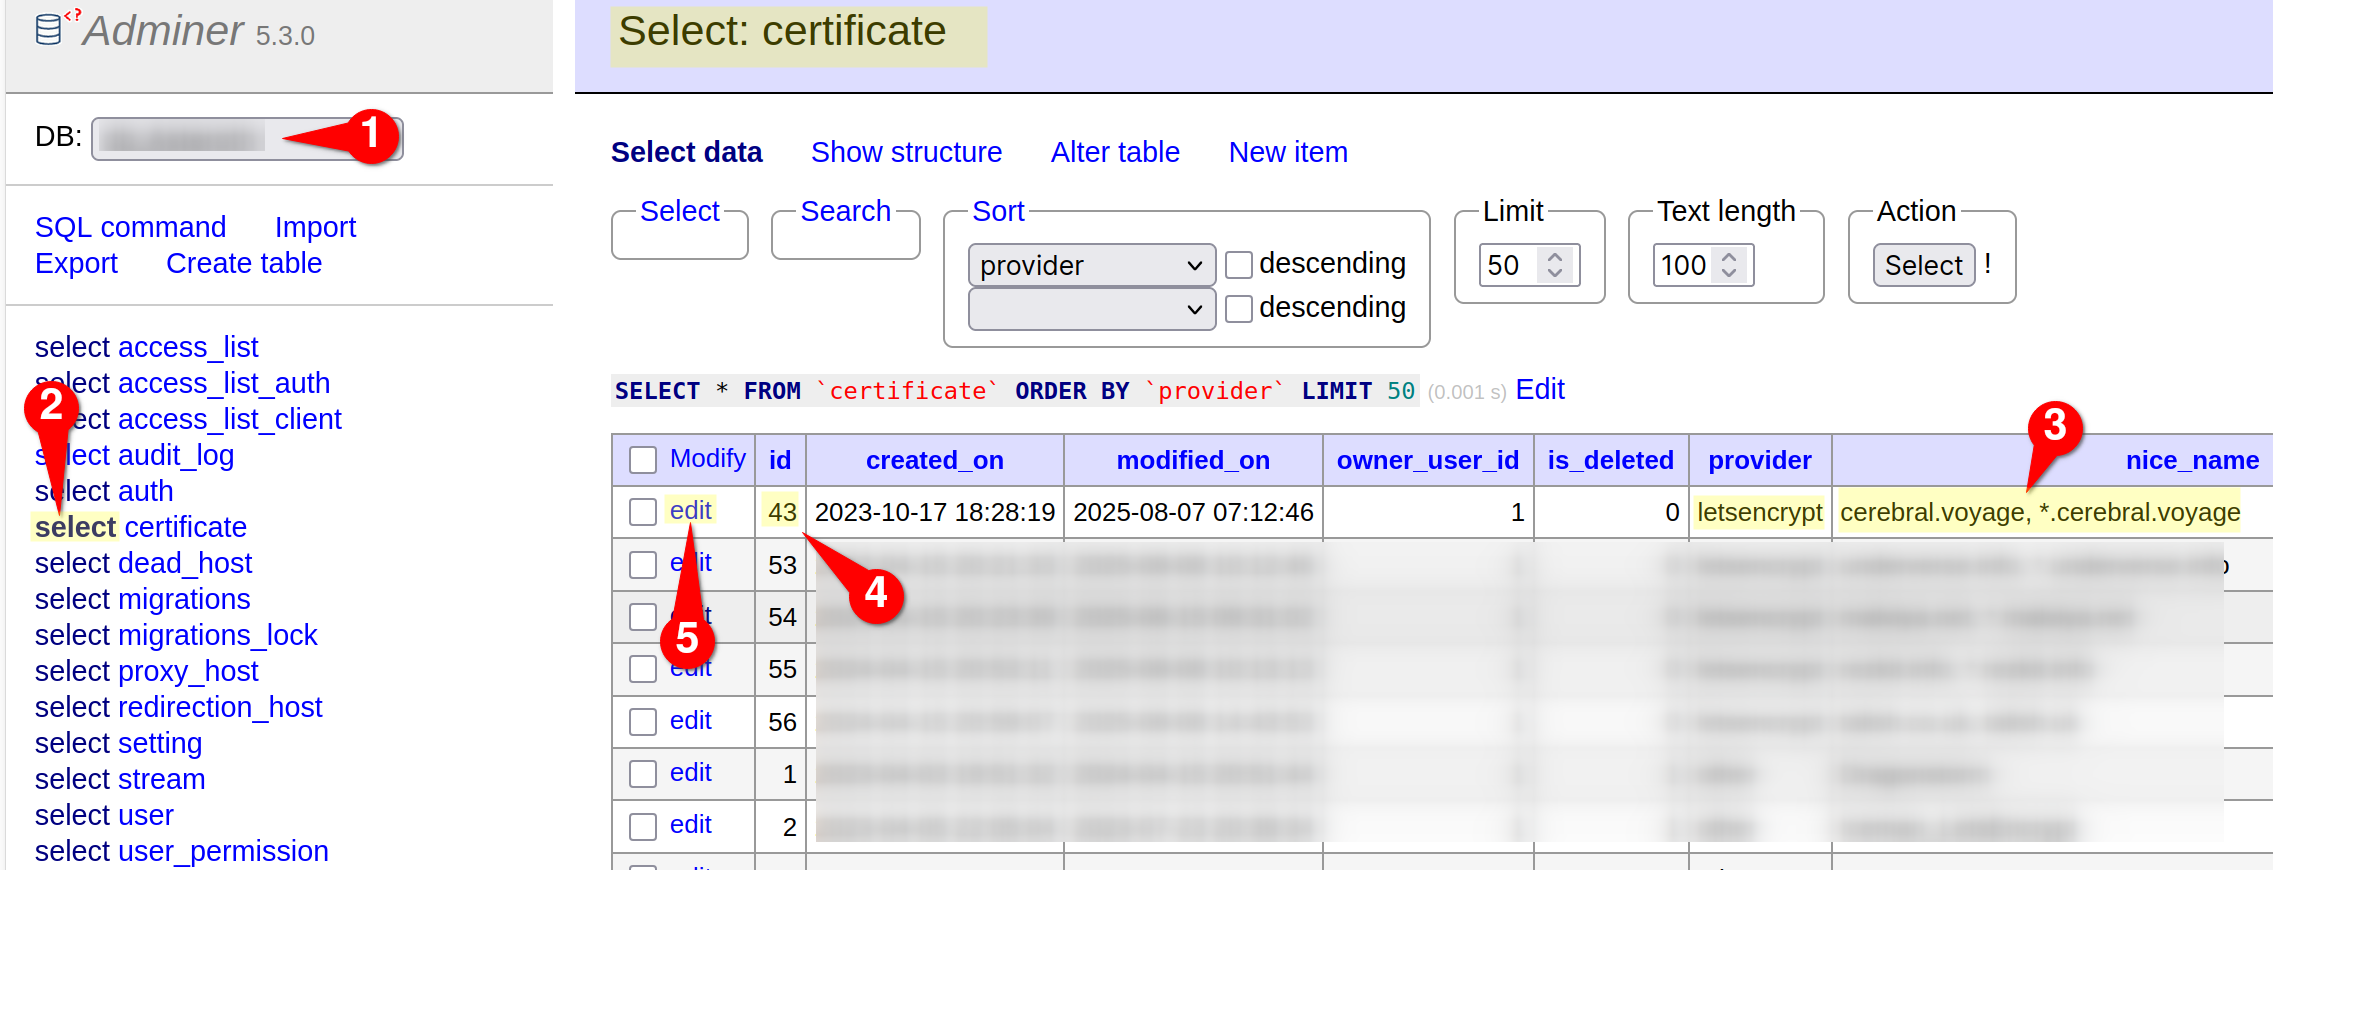
certificate table in the NGINX Proxy Manager database.Edit the meta field, which contains information about the DNS provider and its associated credentials, as shown in Fig. 3.
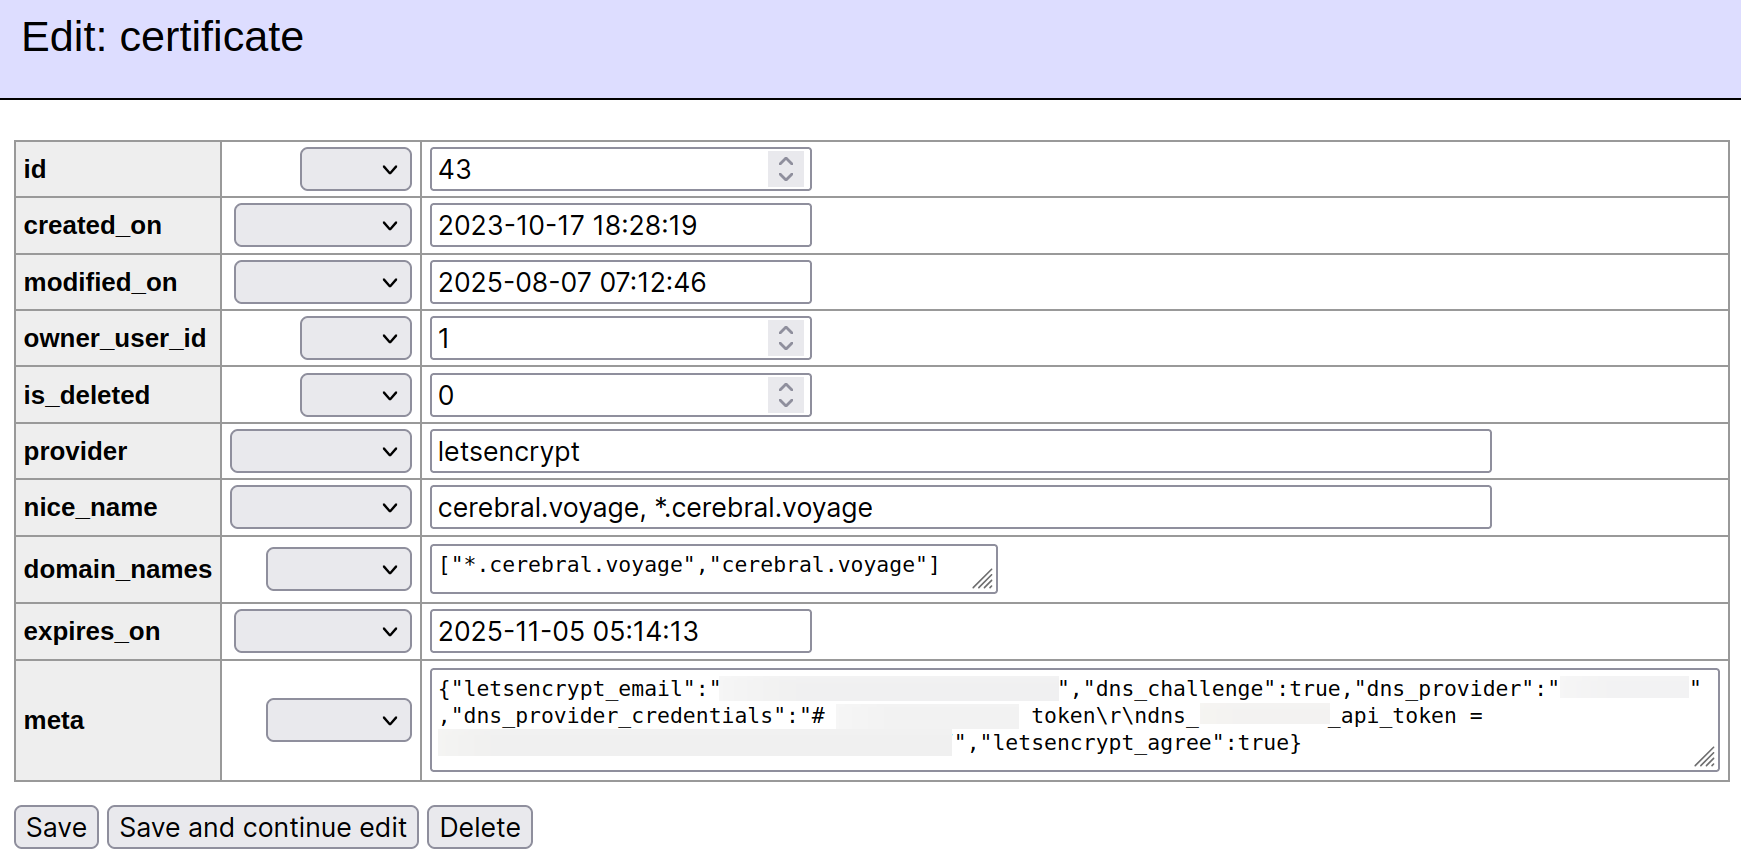
For certificates configured with Cloudflare as the DNS provider the meta field would contain a JSON string which looks like this.
{"letsencrypt_email":"certmaster@domain.tld","dns_challenge":true,"dns_provider":"cloudflare","dns_provider_credentials":"# Cloudflare API token\r\ndns_cloudflare_api_token = L5n9n5WkkPo4HgKWaB0nsodCtQuiUEyESZ-lJy3Z","letsencrypt_agree":true}
For certificates configured with Namecheap as the DNS provider the meta field would contain a JSON string which looks like this.
{"letsencrypt_email":"certmaster@domain.tld","dns_challenge":true,"dns_provider":"namecheap","dns_provider_credentials":"dns_namecheap_username = certmaster\r\ndns_namecheap_api_key = whhaqwnkf4sts5iec3oyro0oid60ogjc","letsencrypt_agree":true}
For migrating the DNS provider to Porkbun, update this field with a new JSON string with the following values:
| Key | Value |
|---|---|
letsencrypt_email |
No change |
dns_challenge |
No change |
letsencrypt_agree |
No change |
dns_provider |
porkbun |
dns_provider_credentials |
dns_porkbun_key = pk1_bt7twcek5twatka1u2emcllru1jwfwz7wn8jtyo3xncib6iqv6jscwoy6k9itm49\r\ndns_porkbun_secret = sk1_4t87h03ffl7732a69j59myaaibyc06q9hy94cnv9lrpizqt6en7o7ldpkikjrs9x |
The new contents of the meta field would look something like the following.
{"letsencrypt_email":"certmaster@domain.tld","dns_challenge":true,"dns_provider":"porkbun","dns_provider_credentials":"dns_porkbun_key = pk1_bt7twcek5twatka1u2emcllru1jwfwz7wn8jtyo3xncib6iqv6jscwoy6k9itm49\r\ndns_porkbun_secret = sk1_4t87h03ffl7732a69j59myaaibyc06q9hy94cnv9lrpizqt6en7o7ldpkikjrs9x","letsencrypt_agree":true}
modified_on field with the date and time that the change is made.\r\n to denote the end of a line and carriage return. This is particularly important for multi-line configurations.Restart or Renew
Once the changes to the configuration have been made, the NPM container can either be restarted or the certificates can be manually renewed from the web UI.
Conclusion
With all the convenience that NGINX Proxy Manager provides for small scale deployments, it seems unfair to ask for more. However, for the admins who only want to edit the DNS provider configuration without changing the Let's Encrypt registration information, there is no functionality within NPM to change this.
This article has provided a guided description, along with an example, to change the DNS provider settings for SSL certificates configured in NPM. It attempts to decompose the relevant workings of NPM and only modify the areas which require this change. Although it appears to be more complicated than simply deleting a certificate and then starting fresh, it simplifies the information by retaining the Let's Encrypt registration information reuses the Let's Encrypt pseudo-account with the new DNS settings. Once these changes are made, NPM takes over and resumes all normal functionality including regular auto-renewals.
Future
In August earlier this year (2025), NGINX announced native support for the ACME protocol in a preview release.
The post quotes...
The implementation introduces a new module
ngx_http_acme_modulethat provides built-in directives for requesting, installing, and renewing certificates directly from NGINX configuration.
This enhancement has the potential to hugely simplify the SSL certificate management functionality within NGINX Proxy Manager. However the move away from the well-established tooling of Certbot along with its large ecosystem of plugins may also hinder the reach of NGINX Proxy Manager, whose target consumers - mainly self-hosters and homelab admins - have seen a diverse use of DNS providers both big & small. It will be interesting to see how the ecosystem of NGINX's native implementation grows to support the diversity in DNS providers.
Feature image by FlyD from Unsplash.
Update 1 • 10-Oct-2025
- Added minor clarifications to some statements.
- Fixed minor typos.
Update 2 • 30-Oct-2025
Fixed minor typos.